

The deadline to migrate Datamart to Data Warehouse in Fabric is October 1st 2025.
In my previous post I explored how to use PowerShell to Migrate a Datamart to a Data Warehouse using an Accelerator. In this post, I will cover the steps to manually Migrate a Datamart to a Data Warehouse. I actually prefer this methodology over the accelerator because of control and my personal limited knowledge and experience with PowerShell (if something goes wrong its not always obvious how to fix this).
If you would like to use the accelerator, reference my previous post for instruction and GitHub References.
Step 1: Export your Datamart Template
In your Workspace with your Datamart. Go to your Datamart, select Transform data from the ribbon, and then choose Export template to save your Power BI Datamart schema and data as a template in Power Query Online (Download).

Step 2 (Optional): Create a new Fabric Workspace.
I created a new Workspace for demo purposes, but this also may be best to keep Workspaces clean and organized (the old could be deprecated & deleted upon removal of Datamart support)
Step 3: Create a New Fabric Warehouse
New Item > Warehouse > [Your Warehouse Name Here] > OK

Step 4: Create a Dataflow Gen 2
IMPORTANT: STAY IN YOUR NEWLY CREATED DATA WAREHOUSE.
Go to Get Data > New Dataflow Gen2 > [Your Dataflow Name]
Once this loads you will then select “Import from a Power Query Template”
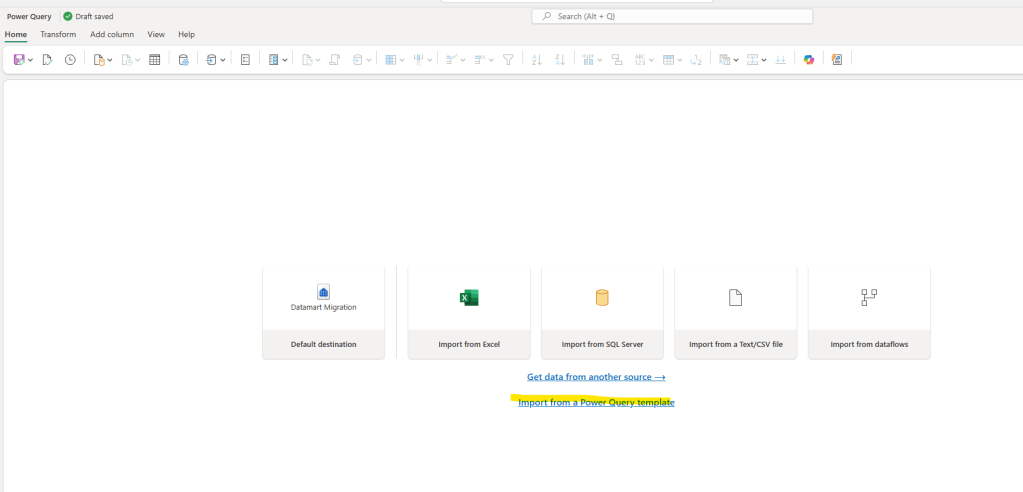
Once your queries load, you may have to re-enter credentials.
Once square, Save & Run your new Dataflow Gen2 (Purple Save Icon in the Upper Left).
Step 5: Check for Migration Status
By right clicking on the three ellipses next to the Dataflow we can investigate the progress of our migration into the Warehouse.
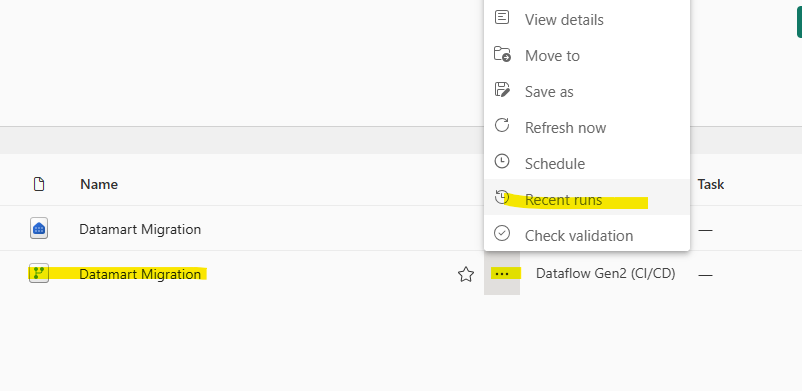

If you click into the run (date/time stamp) as it is “In Progress” you will see a few different sections.
Including Status, Start Time, End Time, Duration, Request ID, Session ID, and Dataflow ID.
However, the most important thing are the bottom two sections: Tables & Activities.
In my case, Tables loaded first, showing an indicated status of “In Progress” then “Succeeded”.
Follow by those same Tables being Loaded in Activities. This is the active Migration of Data from the Dataflow into the Data Warehouse.
Once everything succeeds, click into your Data Warehouse. Under dbo, you should now see a sub folder called Tables with all of your Queries loaded.
Do not forget to change your source in your original Power BI report to the new Warehouse/Dataflow Source – if you need a SQL Connection String you can get this by right clicking on the three Ellipses next to Warehouse and copying the “SQL Connection String”.
And that is it. The Migration using these manual steps is fairly painless. Once again, DataMarts are being deprecated by Micrsoft on Oct 1, 2025 so be sure to migrate prior to avoid refresh catastrophes and data lapses.
 Not a Pickle
Leave a comment